"Lomo" or Lomography describes a certain photographic technique that involves specialized equipment
To start we will need a good photograph to work with, since this effect works mostly on the colors in a photo it would be a good idea to use a picture that emphasizes color.
Step One
To begin we are going to change the colors to make them more lomo like. Do this by going to Image>Adjustments>Curves and in the drop down menu that should say "RGB" change it to "Green". Here is the curve I used for the Greens:
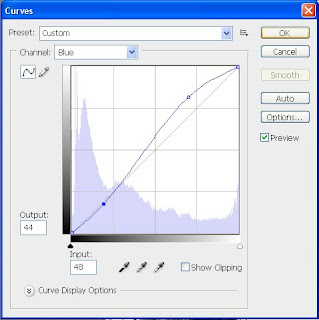
Now change it from "Green" to "Blue". Here is the curve I used for the Blues:
Now we just need to adjust the Reds so change it from "Blue" to "Red", here is the curve I used:
You photo should now look a bit like this:
Step Two
Now we want to increase the contrast to better emulate the lomographic look. Go to Image>Adjustment>Brightness/Contrast and set the contrast to "+70" or whatever might work best for you. It should now look a bit like this:
Step Three
All we need to do now is add a little bit of vignetting to our photo and we will be done. Create a new layer and set it to Multiply and set the Opacity to "50%". Now grab your Gradient Fill Tool which you'll find by clicking and holding on the Paint Bucket Tool. Click the Radial Gradient and make sure your selected color is Black. Click on the center of the image and drag out past the edges of it. It should now look like this:
And we're done!
I hope you found this tutorial informative, if you have any question please feel free to ask and I will answer. Now that you're done go check out some of my other tutorials.


I found this post useful.I was trying to find this. Really refreshing take on the information. Thanks a lot.http://tutorialforphotoshop.com
ReplyDeleteI found this useful. But seems there's not much different between step 2 and 3? Is that the photo of step 3 not yet show the vignette effect?
ReplyDelete