Wednesday, May 4, 2011
CS5 Tutorial - How to Create High Contrast Black and White Photos
Black and white photography is great and can really create a stunning image. Some black and white photographs look better when they're soft but other times a high contrast image with a lot of details is called for. This easy to follow free Photoshop tutorial will teach you how to create stunning high contrast black and white photos from otherwise mundane color photos. The process is easy enough for a beginner but provides information that is useful for even the most experienced Photoshop user.
We begin by opening our photo in Photoshop, if you need to do any small adjustments then do so now. You will notice that this photo isn't particularly interesting and doesn't have much tonal depth. It does, however, have a lot of potential. This technique works best on photos that have a lot of details such as the grungy surface of this building.
Some cameras have the option to take photos in black and white and some don't. Personally, I like taking all my photos in color because I can always convert them to black and white later. We do this simply by clicking on Image>Adjustments>Desaturate. Now that we have our black and white photo you can see that there isn't much contrast in the tones.
To remedy this we're going to adjust the Levels. Click on Image>Adjustments>Levels to open the Levels menu. This particular image was a little flat so I wanted to increase the shadows more than the highlights. Moving the black arrow right will make the shadows stronger and moving the white arrow left will make the highlights stronger. The image above shows the settings I've used but yours might vary slightly depending on your photo.
We should now have a slightly more interesting photo like this:
Now we can see that our levels adjustment has really added more tonal depth and has increased the contrast. The photo before was really rather uninteresting and the stronger shadows and highlights have definitely improved it quite a bit.
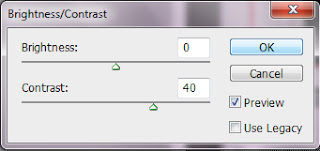
The next thing we want to do is adjust the contrast of the overall picture. We do this by clicking on Image>Adjustments>Brightness Contrast. Right now we're only really going to concern ourselves with the "Contrast" slider like so:
The difference may be a bit subtle but it is noticeable when you compare the two photos. We should now have a photo with some good contrast. At this point the photo should look a bit like this:
Now we're really starting to get a nicely detailed black and white photo with some good contrast. The only problem is that we have lost some detail and contrast in a few of the darker areas such as in the doorway. We're going to remedy this problem by adjust the shadows and highlights some more.
We do this by clicking on Image>Adjustments>Shadows Highlights. Here are the settings I used:
A little bit goes a long way in this case so I've only adjusted the Shadows 10%. Since the photo I'm using was rather light to begin with I didn't need to adjust the Highlights but if you do then feel free to do so now. Click "OK" and we should have a photo that looks a bit like this:
At this point we really have a great picture with a lot of gritty details and plenty of contrast in the different tonal values. We could, theoretically, stop here but I wanted to add a little bit more to really make the image pop and add to the contrast.
There were only a few places that I felt were still too flat so I decided to touch them up a bit with the Burn and Dodge tools. These two tools are great for occasions such as this and can come in handy pretty often. The Burn tool will make things darker and the Dodge tool will make things brighter. You can find them both on your tool menu, clicking and holding on the Burn tool will allow you to select the Dodge tool and vice versa.
The black arrows in the above photo are where I applied the Burn tool which was set to "Shadows" at 50% opacity. The white arrows are where I used the Dodge tool set to "Highlights" at about 30% opacity. Depending on the photo you're working on you may want to play with the settings a bit. This last step has really made the image pop.
Now, just add a border and we're all done!
I hope you have found this tutorial to be helpful and informative. If you have any questions please feel free to leave a comment and I'll try my best to find you an answer. Now that you've completed this tutorial you might want to check out some of the other tutorials we have on this site.
Labels:
black,
high contrast,
photo effects,
photography,
photoshop,
white
Subscribe to:
Post Comments (Atom)


I found this post useful.I was trying to find this. Really refreshing take on the information. Thanks a lot.http://tutorialforphotoshop.com
ReplyDeleteSuch a great tutorial that is. really its very help me.
ReplyDeleteClipping Creations India | ecommerce image editing service
I really like your writing style, superb information, thanks for putting up
ReplyDeleteclipping path service provider
clipping path service
background removal service
Great tips on creating high-contrast black and white photos! I love how impactful they can be. If you're interested in furniture photography, check out my tutorial for some fantastic insights and techniques to make your furniture shots shine!
ReplyDelete